Saturday 31 March 2012

Philip's 21st Birthday Beer Cake

This was another one of my secret baking missions to make something for someone in my house without them knowing. This time it was my for my brother who has just celebrated his 21st birthday. I had a lot of different ideas before I settled on making a Beer Cake. I went to my local cake supply shop and saw the baking tin mould hanging from the ceiling and knew it would be perfect as, shockingly, he rather enjoys beer. Any people who clicked on this thinking this would be an amazing cake with beer in it, I’ll disappoint you now by telling you it’s just an amazing cake shaped like beer!
I thought about doing either an apple or a chocolate cake as the main basis of the cake but I wasn’t sure what quantity of mixture I would have needed. The cake shop recommended a six egg mixture (although I thought they said six ounce so upon making a six ounce mix quickly established it would not be enough and made a second one to put on top!) so I followed my tried and tested Victoria sponge recipe from my mum’s Good Housekeeping recipe book. The cake took quite a while to cook through to the centre so in order to stop the cake burning I covered it with foil after 30minutes in the oven. Despite greasing the pan within an inch of its life before putting the mixture in it was a bit of a challenge getting it out! I had to get my dad to hold it upside down over a wire rack while I banged on the tin to try and loosen it. Luckily it then gently fell out with zero cake casualties.
After waiting about 30-45 minutes for the cake to cool down enough I started the decorating part of the process. Now I’ve never decorated a big cake before, let alone one shaped like beer but it seemed straightforward enough and I think  I did quite a good job, if I do say so myself. For the main beer part I used one packet of Regalice royal icing in ‘teddybear brown’. I rolled it relatively thinly to ensure it covered the whole area and also so that the moulding on the cake still showed through clearly. For the froth, I made one batch of hummingbird bakery buttercream icing, applied with a spatula and a tea spoon and voila! A cake that looks like beer.

My brother was very pleased with his cake, and so was I, although he did say it was cheating that I used a moulded tin… And while I was worried that the cake might be a little dry after its extensive oven time, it isn’t at all. All in all I think my first foray into the world of cake decorating went quite well and it’s definitely something I shall be doing more of in the future!

Here are the two recipes I used:

Victoria Sponge from Good Housekeeping
175g butter/margarine
175g caster sugar
3 eggs, beaten
175g self-raising flour

Grease and base line 2x 18cm (7inch) tins

Beat the butter and sugar together until pale and fluffy. Add the eggs a little at a time, beating well after each addition. Fold in half the flour using a metal spoon then fold in the rest

Divide the mixture evenly between the tins and level with a knife. Bake in the oven at 190°C for about 20minutes until they are well risen and firm to touch. Leave to cool on a wire rack

Hummingbird Bakery Buttercream Icing
250g icing sugar
80g unsalted butter
25ml milk

Put in a bowl and blend together until it looks like icing!

Then of course, Lick Your Spoon!

Sunday 25 March 2012

Vegan Gingerbread Men

This month’s vegan treat is Gingerbread Men! (The clue was in the title really…) The child in me loves making these as they are so much fun. Cutting out shapes and ten decorating colourfully with icing and any other treats you fancy, what’s not to like? And of course, as is pretty much every recipe I’ve done so far, it’s super easy. This recipe was in fact designed by Waitrose with young children in mind. It also as helpful ideas for how to turn these into Christmas decorations!
As I did previously, to turn this recipe vegan I just swapped out the butter for dairy-free margarine, simple! While this recipe is very self explanatory, one tip I will give it to melt the margarine, sugar and syrup on a very low heat to avoid burning the sugar. This also helps keep the temperature of the mixture down (obviously) which is useful for when you mix it in with the flour and come to manipulate your dough as if it was too warm it’d be hard to handle and need chilling time.
Another suggestion would be to add some more ginger. If you’re considering making these, I’m assuming ginger is something you like so if I were you I’d add another 1-2 tsps of ground ginger to the mix. There are obviously other spices such as cinnamon that you can include but as I personally don’t like them I won’t be recommending that you do!
With my gingerbread man cutter I made 28 men before I gave up re-rolling and finished the dough off in a blob which gives you the perfect excuse to erm… ‘test’ the outcome when it comes out of the oven. I left mine to cool on the tray for about 3-5minutes before transferring tem to a wire rack to cool completely. To decorate I just outlined the men using icing pens and drew on a face and some buttons. You can of course use the icing to stick other things on or push things in for the eyes while the dough is still soft and warm.

Here is the recipe:

125g dairy-free margarine (unsalted butter)
100g dark muscovado sugar
4 tbsp golden syrup
325g plain flour
1 tsp bicarbonate of soda
2tsp ground ginger (I recommend using 3-4 tsp)

Preheat the oven to 170°C. Line baking trays with baking parchment

Melt the butter, sugar and syrup in a medium saucepan, stirring occasionally, then remove from the heat

Sieve the flour, bicarbonate of soda and ginger into a bowl and stir the melted ingredients into the dry ingredients to make a stiff dough

Turn out onto a lightly floured surface and roll to a thickness of about 5mm. Dip biscuit cutters into flour before cutting the dough. Place the shapes onto the lined baking trays and bake, in batches, for 9-10 minutes until light golden brown and allow to cool completely before icing

Lick your spoon!

Wednesday 21 March 2012

Lemon Drizzle Cake

So as I’m sure you all know, it was Mother’s Day last Sunday and this cake was part of my present to my mum. She loves lemons (and most fruits) so when I saw this recipe during my Lakeland online browsing (I could spend a fortune in that shop!) I thought it would be perfect! You can find the original recipe here. I, 
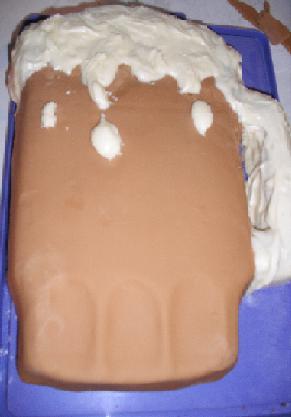
slightly inadvertently, did a minor variation to this because, as you can see from the pictures, I didn't have the usual sugary, hard topping on my cake.
You’re supposed to leave the cake to cool for 15-20minutes before putting the sugary mixture on top and then leave to cool fully in the tin before you move the cake. This is to ensure the sugar doesn’t run straight off and will harden on the cake. I highly recommend using a loose bottom cake tin for this cake which I didn’t have in the right size (20cm is the best size for this recipe).
Consequently, I used a regular cake tin and so had to take it out before putting the sugar mixture on or else I wouldn’t have been able to get it out without ruining it. Not only could I not let it cool in the tin but as the cake was surprise I had to make it in secret which didn’t give me enough time to leave it to totally cool! Instead of settling on the top and hardening, the mixture seeped into the sponge and so left it moist and very lemony, especially on the top.


While it perhaps doesn’t look as pretty, it tasted amazing and as it turns out, my mum doesn’t really like the crunchy bit so it worked out for the best! Everyone else in the family enjoyed it also and it was completely devoured in 2days. I’ll certainly be buying a loose bottomed tin to try it again as Lakeland intended and it’s definitely a recipe for the binder!

Here is the recipe:

200g unsalted butter, softened
175g golden caster sugar
4 unwaxed lemons
3 medium eggs, beaten
200g plain flour
2 tsp baking powder
Pinch of salt
50g almonds (I left these out)
2 tbsp milk
5 tbsp granulated sugar

Preheat your oven to 180°

Cream together the butter and caster sugar until pale, light and fluffy

Grate the zest from two of the lemons and add to the mixture. Gradually add the beaten eggs, mixing well after each addition

Sift together the flour, baking powder and salt. Using a large metal spoon, fold into the cake mixture, then fold in the ground almonds

Add the milk and the juice from one lemon and mix until smooth

Spoon the mixture into the prepared tin and level wit a palette knife. Bake on the middle self of the oven for 45 minutes or until golden brown and a skewer inserted into the middle of the cake comes out clean. (My cake was still slightly uncooked in the middle when it was already verging on very brown so I covered it over with some foil to stop it colouring further while the middle cooked)

Definitely Lick Your Spoon at this point, the mixture is lush!

Cool the cake in the tin for 15-20 minutes. Meanwhile, squeeze the juice from the remaining lemons and mix with the granulated sugar. Spoon the sugary lemon juice over the top of the warm cake and leave in the tin until completely cool.

OR skewer the top and pour over the sugar mixture to infuse the sponge and leave a glazed top like I did.

Saturday 17 March 2012

Palmiers

So as I mentioned in my last post, my brother and I recently went to Madrid. While we were there we did a lot of sightseeing so did quite a bit of eating on the move. We also were trying to do eat for the least possible expense so while we were there, there were two particular foods we ate quite a lot of… Palmiers (or Palmeras in Spanish) and Churros (Philip definitely ate about 8 Churros a day on average…).
Palmiers were also one of my favourite bakery products during my year in France so this week I looked up a recipe to make them. I found a very simple recipe initially aimed at using up puff pastry trimmings by the Pink Whisk (aka Ruth Clemens from the Great British Bake Off, and my favourite contestant so far!). It looked so straightforward, what could possibly go wrong?

Clearly those were my famous last words. The first time I made them pretty much everything went wrong! They were the wrong shape, not sugary enough and not crispy in the least. The pictures here are from my second attempt later in the week but as you can see from the end result, I still can’t get the shape right but as I added lots more sugar and cooked them for longer they had a better taste and texture than before.

After looking at other recipes online, quite a lot of people roll their pastry into the centre rather than fold it and use even more sugar than I used on my second attempt so I think I’ll try that next time! As I haven’t found a recipe I really like yet I haven’t included one in this post but I have included a link here to Ruth’s recipe if you want to test it out yourself!

Wednesday 14 March 2012

Strawberry Cupcakes

It’s been a little longer from my last post than usual as I was on holiday enjoying sunny Madrid with my brother but I’m back! And full of recipe inspiration so I have lots of exciting (I think) recipes to try out! My mum found this one for me in a magazine but it’s actually from Marian Keyes new book Saved by Cake. As it’s chocolate-free it’s perfect for my lent blog posts and full of yummy strawberries!
It’s an unusual recipe in the fact that it uses plain flour and bicarbonate of soda rather than the typical self raising flour for cake making so I made sure to beat the wet ingredients for a long time as I thought it would help get some air in it. It’s a very straightforward recipe and I have to say the hardest part was mashing the strawberries! I’m sure none of you would be silly enough to try and mash something in a round bottomed bowl, but don’t do it, it doesn’t work. I eventually switched to doing in a pasta dish and that was much more successful!
Don’t be put off by the fact that by the time you’ve mixed in the strawberries and the flour the mixture looks a little grey, and that when they come out of the oven they still look a little unusual. Marian Keyes tells you to decorate them pinkly so by the time you’ve finished you, and your friends and family, will be unable to resist and they do genuinely taste delicious.
I just used basic glacĂ© icing following the instructions on the back of the box as I don’t have any piping equipment currently (another shock I know) and I don’t feel buttercream icing applied with the back of a spoon is a very good look. I used some left over strawberry to decorate but obviously there are hundreds and thousands (see what I did there) ways to decorate your finished cakes.


Here is Marian Keyes’ recipe:

200g strawberries, hulled and mashed
100g sunflower oil (I used vegetable oil)
90g caster sugar
2 eggs
180g plain flour
¾ tsp bicarbonate of soda

Preheat the oven to 180°C

Beat the oil, sugar and eggs together for a few minutes until the mix looks caramelly.

Add the strawberries, sieve in the flour and bicarbonate of soda into the wet mixture and fold.

Pour the batter into the cases and bake for about 20minutes.

Then Lick Your Spoon! (and decorate your cakes pinkly!)

Saturday 3 March 2012

Blueberry Breakfast Muffins

I know I have made muffins before but these are breakfast muffins, legitimate morning food. I can hear what you’re thinking, I’ve just put breakfast in the name and expect everyone to believe me, but it’s true! These are ‘traditional’ American muffins which are a lighter mixture with less sugar and are enjoyed at breakfast. Anyone who has stayed in an American hotel can back me up on this one; they usually have a whole stand dedicated to muffins and doughnuts. As I am not a fan of usual breakfast foods, mainly stemming from my severe dislike of milk, you can imagine the idea of muffins for breakfast appealed to me massively.
I found this recipe in Mary Berry’s Ultimate Cake Book that I found for a bargain price in my local Oxfam Bookshop. If you ever get bored of looking online for recipes, charity bookshops are a great place to pick up cheap cookery and baking books. I’m needing a bit of inspiration lately trying to find chocolate-free recipes!
Currently, I have a little obsession with blueberries which is why I chose to do this recipe now. They are a yummy fruit, a great ‘superfood’ and full of antioxidants! I’m even using them in a fresh face mask from LUSH at the moment so let’s hope it’s not possible to turn into one as I don’t fancy looking like Violet Beauregarde. As I said earlier, these use less sugar than regular muffins would, so that with the fruit makes these less calorific than others can be.
Whilst I am usually very good at following recipes, I added a few more blueberries than the recipe suggested and well, they leaked all over the place so my muffins have veins! I also made them as mini muffins once and that doesn’t work as there isn’t enough mixture to support the blueberries and they collapse. So basically, follow the recipe as it says below or use a different filling if you don’t have my blueberry obsession! Of course, no matter what they look like, they still taste delicious.

Here is the recipe:

250g self-raising flour
1 tsp baking powder
50g soft margarine
75g caster sugar
175g fresh blueberries
Grated rind of one lemon (I missed this out as I didn’t have a lemon)
2 medium eggs
250ml milk

Preheat the oven to 200°C

Mix the flour and baking powder in a large mixing bowl and then rub in the margarine with the tips of your fingers until it resembles fine breadcrumbs

Stir in the sugar, blueberries and grated lemon rind

Mix together the eggs and milk and then add to the dry ingredients. Mix quickly to blend it all together. (It is supposed to look lumpy)

Spoon the mixture into muffin cases and bake in the oven for 20-25minutes until golden brown and firm to touch

Then Lick Your Spoon!